|
The PK towers
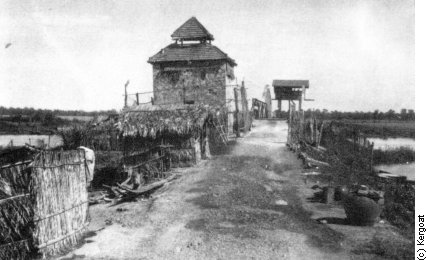
These were introduced in the southern delta in 1947 and later extended
to the Central and Northern Highlands and the Red River delta.
 Most
towers were about 3-4 m wide and 5-6 m high with 30 cm brick walls.
Roofs
were usually tiled and both four-sided and two-sided were common. The
door,
if there was one, was set about 2 m off the ground and was accessed
with
a ladder which was pulled inside the tower at dusk. In many cases, the
risk of one of the defenders opening the door during a Viet Minh attack
(a relatively frequent occurrence) was avoided by having no door at
all,
access being possible only by a ladder reaching the top of the tower !
From 1950, as the Viet Minh fielded increasing numbers of hollow charge
weapons, a layer of logs or bamboo was often added for increased
protection,
covering either the base or the whole of the tower. Most
towers were about 3-4 m wide and 5-6 m high with 30 cm brick walls.
Roofs
were usually tiled and both four-sided and two-sided were common. The
door,
if there was one, was set about 2 m off the ground and was accessed
with
a ladder which was pulled inside the tower at dusk. In many cases, the
risk of one of the defenders opening the door during a Viet Minh attack
(a relatively frequent occurrence) was avoided by having no door at
all,
access being possible only by a ladder reaching the top of the tower !
From 1950, as the Viet Minh fielded increasing numbers of hollow charge
weapons, a layer of logs or bamboo was often added for increased
protection,
covering either the base or the whole of the tower.
These towers are probably the simplest structure to
scratchbuild. Here's
the method used for a very quickly built one.
Materials
-
Cardboard and/or balsa. I used an offcut of 2 mm balsa sheet for the
walls
because it happened to be handy but I don't normally like to work with
balsa.
-
Thin Bristol card
-
PVA glue
-
A small sheet of printed brickwork (Faller N 2559) which was found in a
model railroad shop after the tower was started. This is not strictly
necessary
but if you are in a hurry, it is relatively cheap and gives a
reasonably
good irregular brickwork result without much effort.
-
Bamboo skewer and/or matchsticks
Construction
-
First the templates are drawn. In this case, it was simply four 4 x 6
cm
rectangles with three 5 mm crenellations. Three of the sides had a 5 x
2 mm firing port centred about 28 mm off the ground and the fourth had
a 15 x 8 mm door 20 mm off the ground.
-
After the templates were glued to the balsa with paper glue, the walls
were cut from the sheet and the firing ports cut out. A 36 x 36
mm
square floor was also cut from cardboard.
-
 The
wall edges were then chamfered by the simple expedient of lightly
clamping
them to a steel ruler and then removing the excess wood with a cutter.
Of course, this is not necessary if you know from the start that you'll
be covering all sides with printed card in which case you can simply
have
overlapping corners. The
wall edges were then chamfered by the simple expedient of lightly
clamping
them to a steel ruler and then removing the excess wood with a cutter.
Of course, this is not necessary if you know from the start that you'll
be covering all sides with printed card in which case you can simply
have
overlapping corners.
-
Before the walls were glued together, strips of cardboard were glued on
the inside face to act as supports for the floor. These were about 15
mm
from the top but the exact height depends whether you want a removable
roof to place figures in the tower or not. If so, it will depend on the
size of your figures and the thickness of the base so it's best to
experiment
in any case.
-
The walls were then stuck together with PVA glue and then covered with
the printed card. Each printed card face was cut oversize and the
firing
port cut out from the back (easy to do since the card is backprinted
with
a millimetre grid). The printed card was then glued with more PVA,
taking
care to adjust the firing port, and then the excess was trimmed with
scissors
and a sharp cutter.
-
The floor can be left plain if you use a four sided roof which will be
pretty much hide it all or a trapdoor and planking can be added with
thin
Bristol card with some basic painting in both cases. Likewise painting
the inside faces of the tower's platform needn't take too much time :
simply
paint a base coat in a colour which is reasonably close to the
brickwork.
-
The roof is simply made out of thin cardboard and tiled with bristol
card
with a supporting structure made of matchsticks or bamboo skewers.
Coming next :
Top - Home
|